












For anyone who follows the world of cars closely, the clutch is one of those components that sits quietly in the background until it suddenly demands full attention. It transfers every ounce of engine torque to the gearbox, and when it wears out, the car becomes undriveable. The most common question mechanics hear at the service desk is straightforward: how many hours will this job take? The honest answer depends on the vehicle, the workshop’s equipment, and whether any surprises are hiding behind the bellhousing. This article gives a clear, workshop-based breakdown of what that time actually covers.
What Does a Clutch Replacement Job Actually Involve?
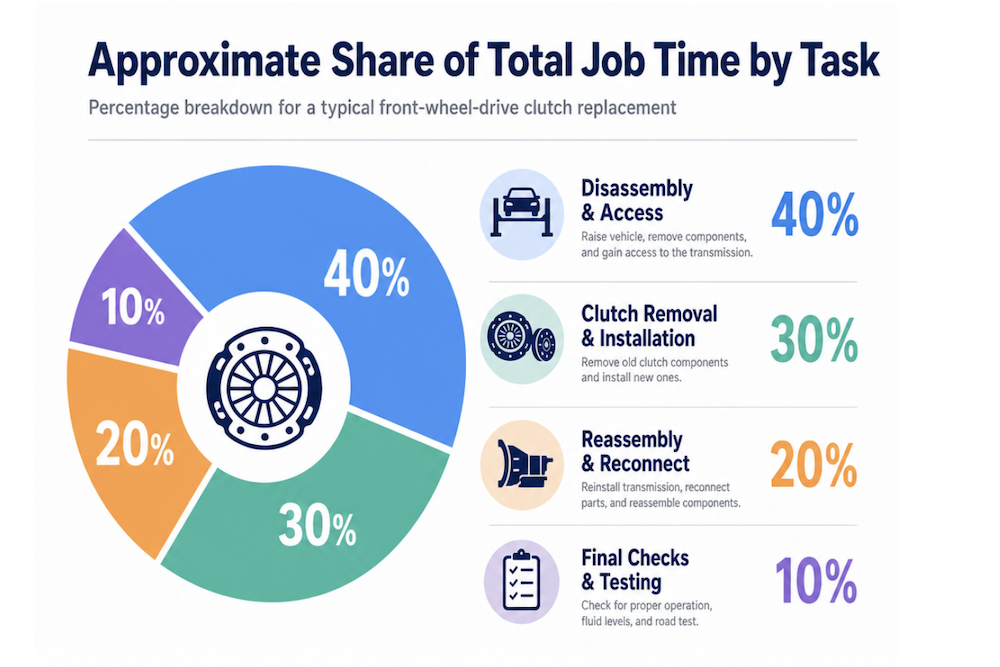
A clutch replacement is not a single task but a sequence of interdependent steps. The gearbox must come out before the worn components are even visible, which is why labour time dominates the invoice.
The job covers removing the gearbox, inspecting the flywheel, fitting a new clutch disc, pressure plate, and release bearing, then reassembling everything and setting the biting point. Sourcing a complete clutch kit that includes all three friction components saves time and avoids a repeat strip-down if one part fails shortly after.
The release bearing is the component mechanics replace as a matter of course, even when it still feels smooth. Its replacement cost inside an open gearbox is negligible; replacing it separately six months later is not.
How Many Labour Hours Should You Expect for Common Vehicles?
Labour time varies significantly between platforms. A front-wheel-drive hatchback with a transversely mounted engine typically takes a trained technician between two and four hours. A rear-wheel-drive saloon with a separate gearbox tunnel often runs three to five hours.
Four-wheel-drive vehicles and those with dual-mass flywheels regularly push beyond six hours once the transfer case and propshaft sections are factored in. Some older vehicles with straightforward layouts can be completed faster, but corroded bolts and seized subframe mounts frequently add an hour or more in real-world conditions.
The table below shows approximate labour ranges for several common vehicle categories.
Which Tools Does a Workshop Need to Do This Properly?
A correctly equipped workshop uses a transmission jack to support the gearbox during removal. Without one, the job becomes physically dangerous and risks damaging the input shaft or gearbox casing.
A clutch alignment tool is mandatory. Fitting the clutch disc without one means the gearbox input shaft will not slide home, and forcing it damages the new disc immediately. Most clutch kits include a plastic alignment mandrel, but workshops often prefer a precision steel version for repeated use.
Additional requirements include a torque wrench for pressure plate bolts, flywheel locking tools specific to the engine, and in many modern vehicles, a diagnostic interface to reset the clutch adaptation values in the transmission control unit.
What Is the Step-by-Step Sequence a Technician Follows?
Professional workshops follow a structured sequence to avoid mistakes and reduce rework. Skipping steps is how comebacks happen.
The numbered process below reflects standard workshop practice for a front-wheel-drive vehicle with a transverse engine.
- 1. Raise the vehicle on a four-post lift or axle stands and remove the undertray.
- 2. Disconnect the battery negative terminal, then detach the gear linkage, driveshafts, and clutch hydraulic line.
- 3. Support the engine from above using an engine support bar.
- 4. Position the transmission jack under the gearbox and remove all bellhousing bolts.
- 5. Slide the gearbox rearward carefully to clear the input shaft without bending the clutch disc.
- 6. Lock the flywheel, then remove the pressure plate bolts in a cross pattern to release spring tension gradually.
- 7. Inspect the flywheel surface for heat cracks, blue discolouration, and scoring; machine or replace as needed.
- 8. Fit the new clutch disc using the alignment tool, then torque the pressure plate bolts to the manufacturer’s specification.
- 9. Fit the new release bearing and check the concentric slave cylinder or fork mechanism for wear.
- 10. Reinstall the gearbox, reconnect all ancillaries, bleed the hydraulic clutch circuit, and road-test.
| Vehicle Category | Typical Labour Hours | Flywheel Type | Notes |
|---|---|---|---|
| Front-wheel-drive hatchback (transverse engine) | 2 – 4 hours | Solid or dual-mass | Subframe removal sometimes required |
| Rear-wheel-drive saloon (longitudinal engine) | 3 – 5 hours | Solid | Propshaft disconnection adds time |
| 4WD SUV with transfer case | 5 – 7 hours | Dual-mass common | Transfer case removal usually necessary |
| Light commercial van (front-engine, RWD) | 4 – 6 hours | Solid | Heavy gearbox; transmission jack essential |
| Sports car with mid-engine layout | 6 – 9 hours | Solid or dual-mass | Engine often partially removed for access |
Should the Flywheel Be Replaced or Resurfaced at the Same Time?
The flywheel decision is the one that most often catches owners off guard when they see the final bill. A dual-mass flywheel cannot be resurfaced and must be replaced if worn; fitting a new clutch disc against a fatigued flywheel shortens the life of both components.
Solid flywheels can be skimmed on a lathe if the surface is within the manufacturer’s minimum thickness tolerance. The cost of machining is usually less than a new flywheel, but only if the metal removed stays within specification.
Checking flywheel runout with a dial gauge takes five minutes once the gearbox is out. Skipping this check to save time is a false economy that mechanics working to a professional standard do not take.
What Are the Most Common Complications That Extend Workshop Time?
Corroded bellhousing bolts are the single most frequent time-thief. A bolt that shears inside an aluminium casing can add two hours of extraction work to any job.
Hydraulic clutch systems with internal slave cylinders require the gearbox to come out for bleeding, which means any leak discovered during the job extends the timeline immediately. Worn engine mounts and gearbox mounts are often only visible with the drivetrain partially disassembled, and replacing them at this stage is far more economical than a separate job later.
On vehicles with electronic parking brakes or complex subframe designs, additional disassembly is sometimes required before the gearbox can move at all.
How Can You Verify the Job Has Been Done Correctly?
A properly replaced clutch has a clean, progressive biting point that sits in the middle of the pedal travel. A biting point that is very high or very low suggests incorrect adjustment, air in the hydraulic system, or a misaligned disc.
There should be no judder on pull-away from standstill, no smell of burning friction material under normal use, and no noise from the release bearing when the pedal is depressed. A short road test on a quiet road, including a controlled uphill start, will reveal most problems within the first few kilometres.
Ask the workshop for the torque values used on the pressure plate bolts and the flywheel-to-crankshaft bolts. A professional technician records these and can provide them without hesitation.
What Should You Check Before the Next Service Interval?
Clutch hydraulic fluid shares its reservoir with the brake fluid on most vehicles. Contaminated fluid absorbs moisture over time and lowers the boiling point, which can cause spongy clutch feel and erratic engagement.
Checking for fluid leaks around the master cylinder and slave cylinder every six months adds no meaningful time to a routine inspection. Catching a weeping seal early means a minor repair rather than a full hydraulic replacement.
Gearbox oil level is worth verifying at the same interval on manual transmissions. Some gearboxes have a combined bellhousing and gearbox casing, and a low oil level accelerates bearing wear that then presents as clutch-adjacent noise.
Before booking the next service, press the clutch pedal slowly to the floor and note exactly where the biting point sits. If it has crept noticeably higher since the last check, have the hydraulic circuit inspected first — it is a five-minute check that can rule out a simple bleed before anyone starts quoting gearbox removal. Keeping a note of the clutch kit part number fitted, along with the mileage at replacement, gives the next technician an immediate reference point and avoids unnecessary diagnostic time.